2023-06-02 Author : admin
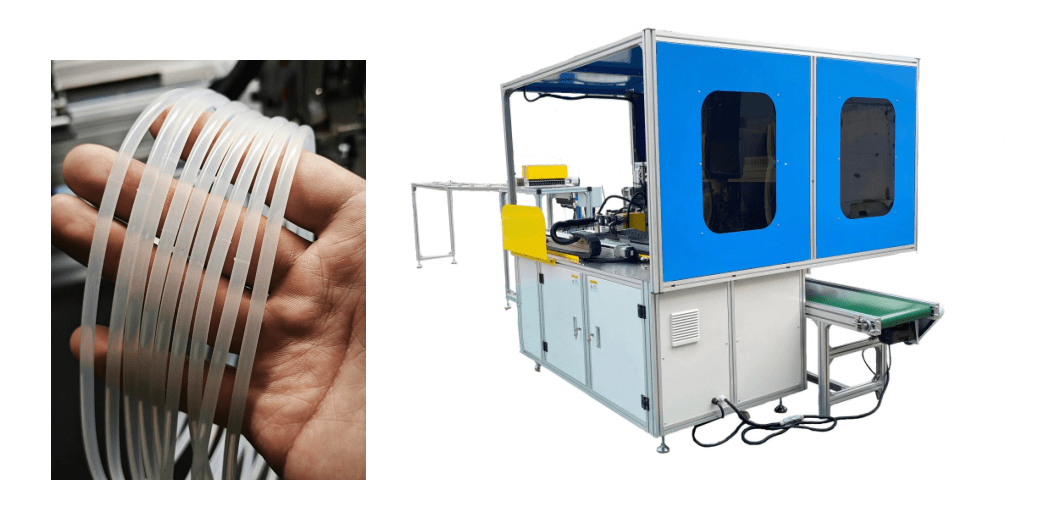
The silicone oring automatic bonding machine is designed for automatic cutting the extruded silicone gaskets into fixed length ,the mechanical hand will draw 15 pcs of silicone gaskets into fixed cutting length and the knife cut them off ,automatic dipping both ends of silicone gaskets with silicone adhesive against the glue brush boards ,the dipping glue times can be set on the machine .normally we set dipping glue two times on the machine . after dipping with glue ,the two mechanical hands will place the adhesive dipped gaskets into the hot mold and the hot mold will close down and heat press the silicone adhesive to cure and form a strong bond of silicone to silicone . after hot bonding, the collection hand will take the bonded o rings from the the hot mold and move them into the transport bands .
below youtube working video of this silicone rubber seals cutting bonding machine
Youtube working video performance to process silicone transparent cords
Below is the chief operation steps for this
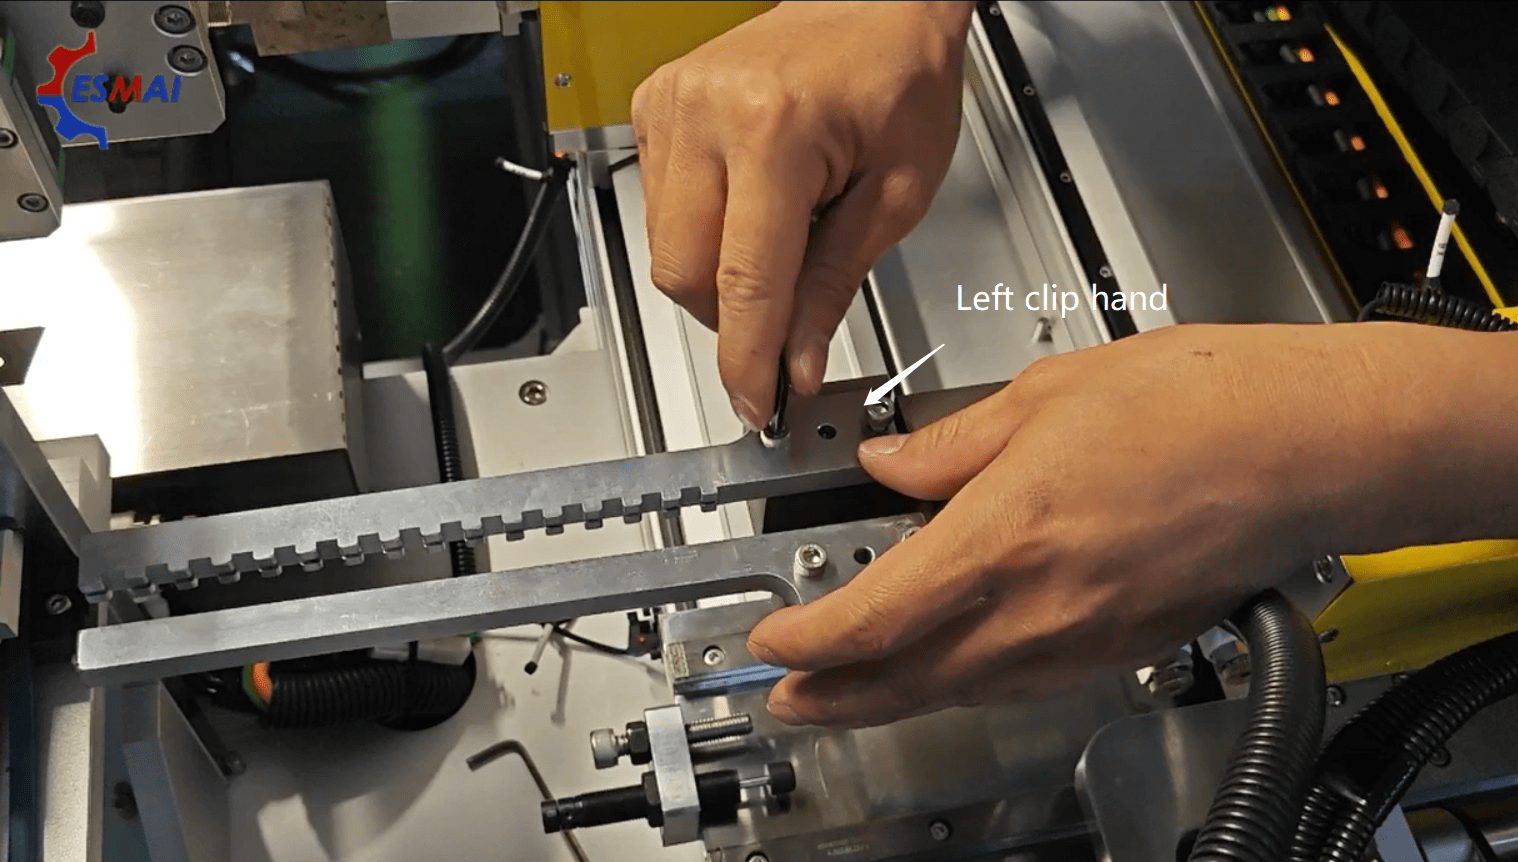
Step 1 Change and load the fixture molds for this encapsulated o ring fusing machine
Youtube video reference : : https://www.chesmai.com/uploadfile/skycaiji/images/2024-10-25/b9ac8548d6cabadd07052ba9ab9dc228.jpg
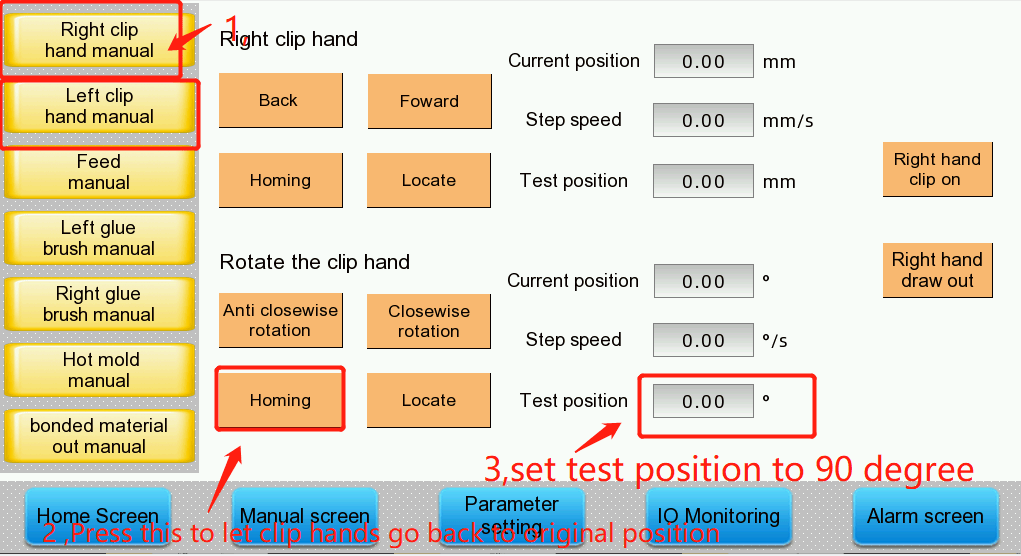
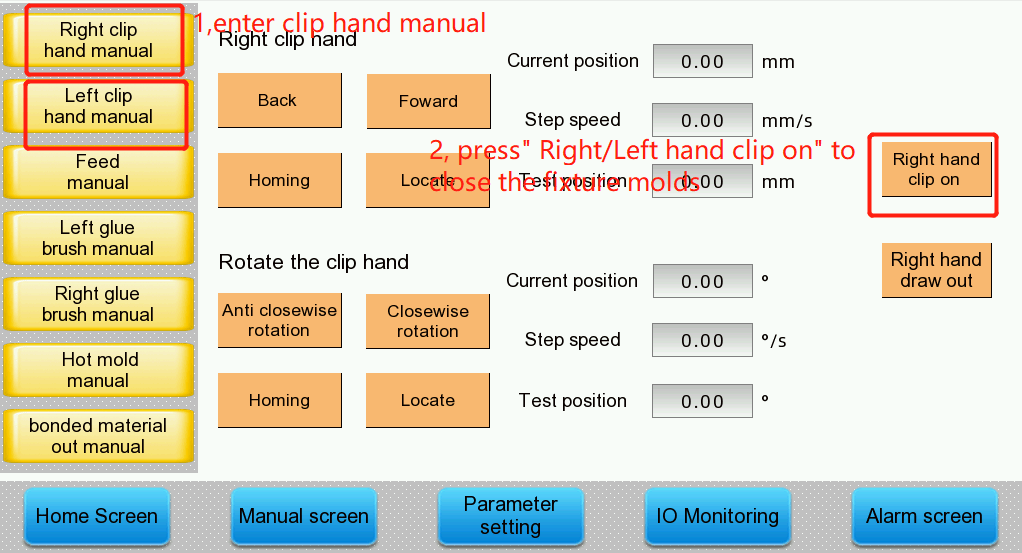
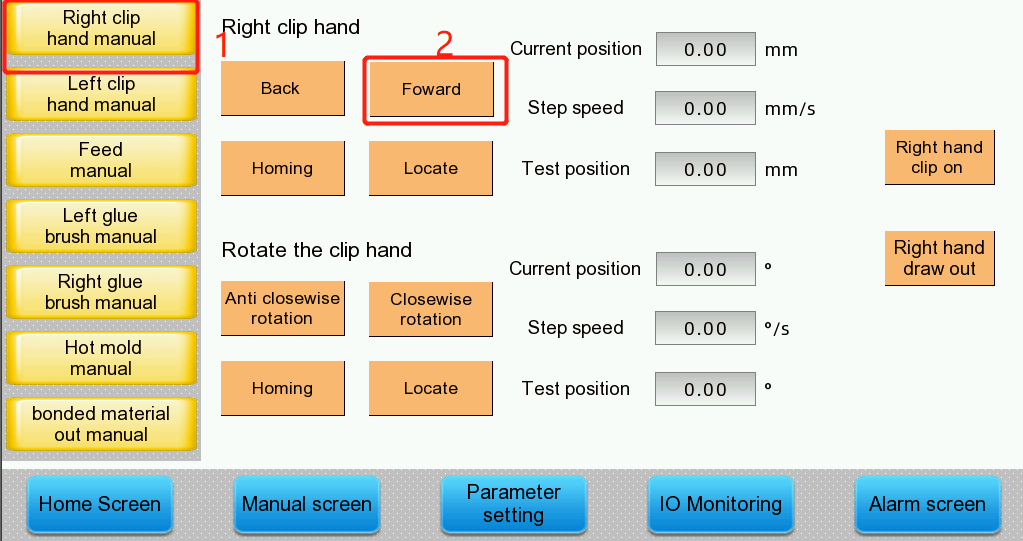
Press “Right clip hand manual/Left clip hand manual” to enter manual control clip hands page, ,firstly ,press “Homing ” to let the clip hands go back
to original position , then set “Testing position” to 90 degrees and press “Locate” and the machanical clip hands will rotation 90 degrees for better changing
and loading new fixture molds
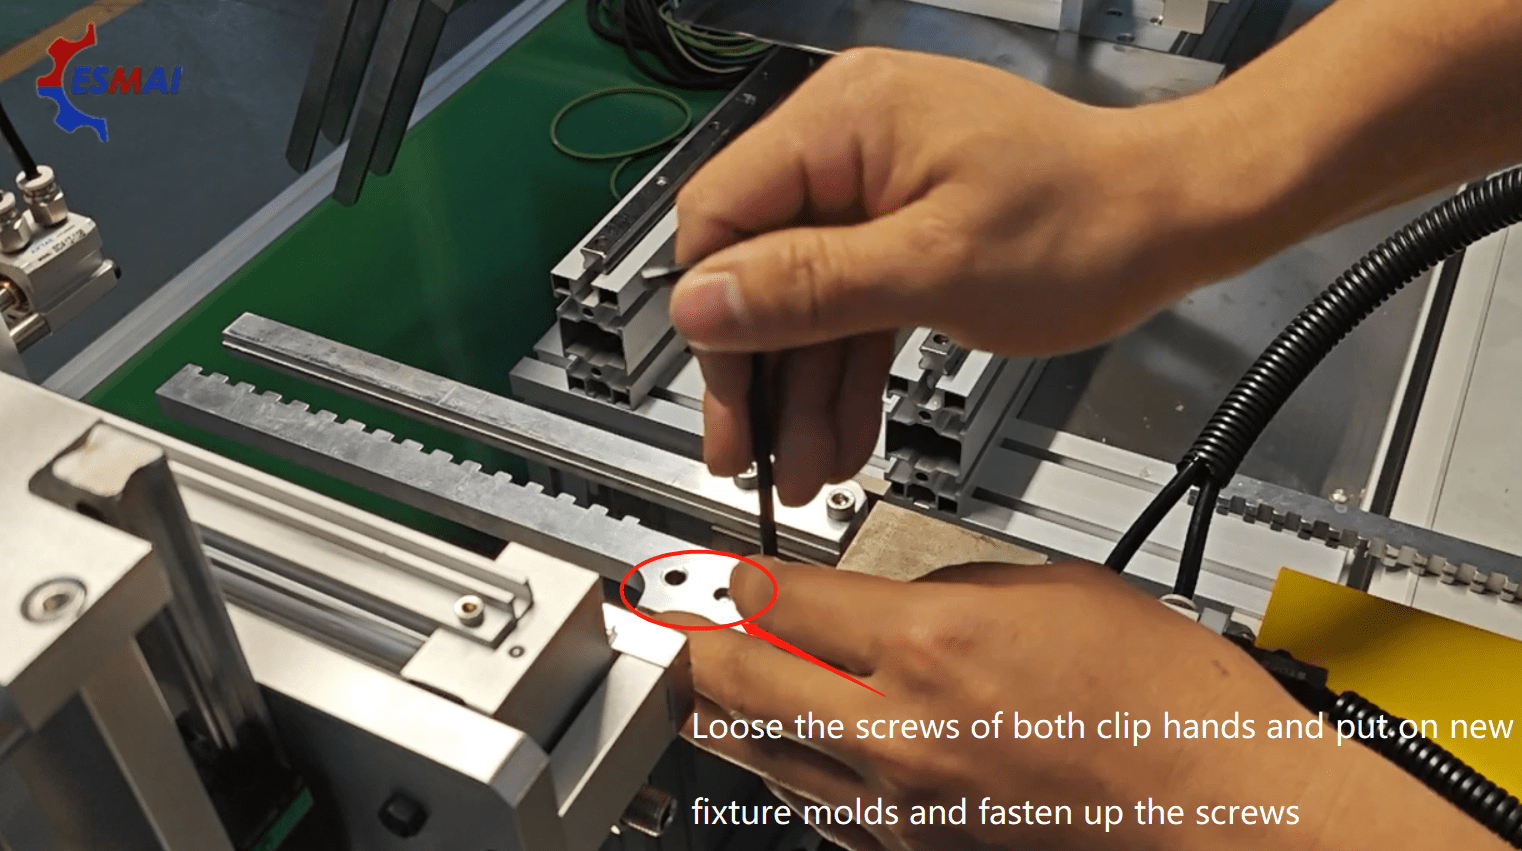
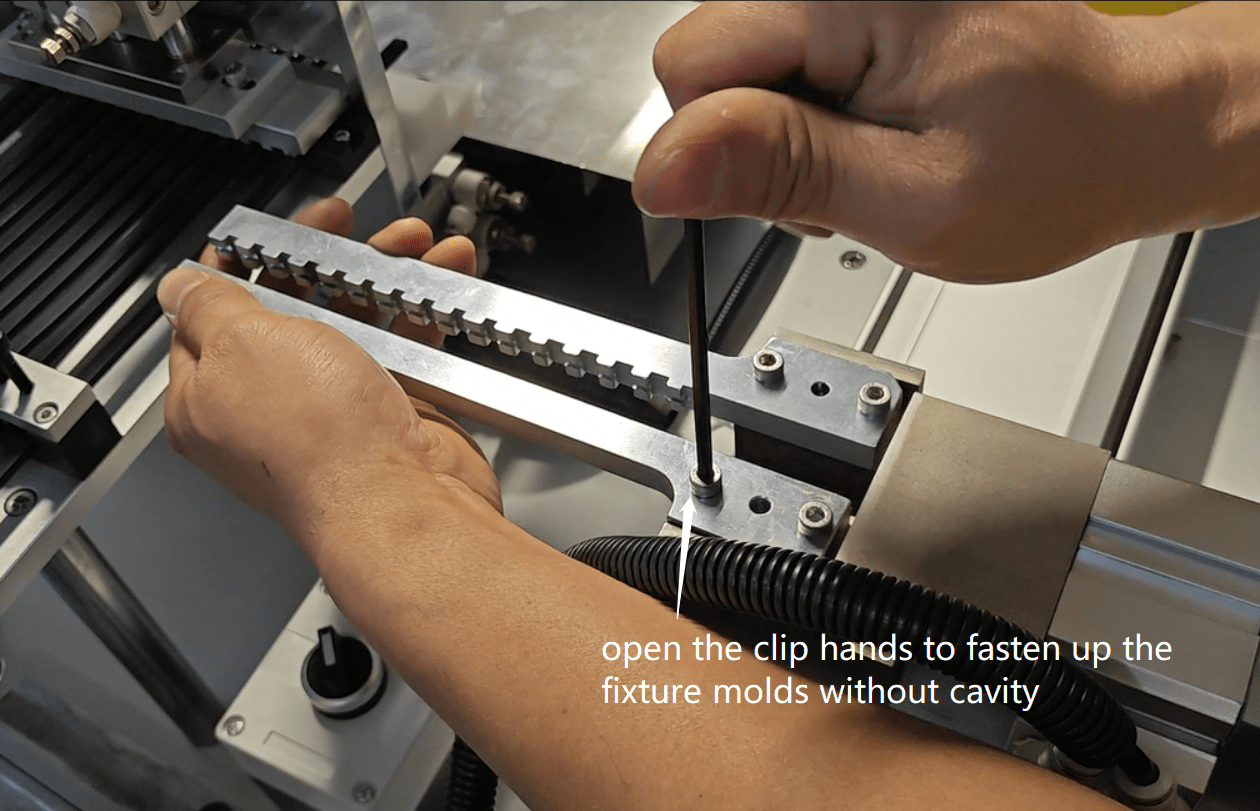
Loose the screws of both clip hands and put on new fixture molds and fasten up the screws
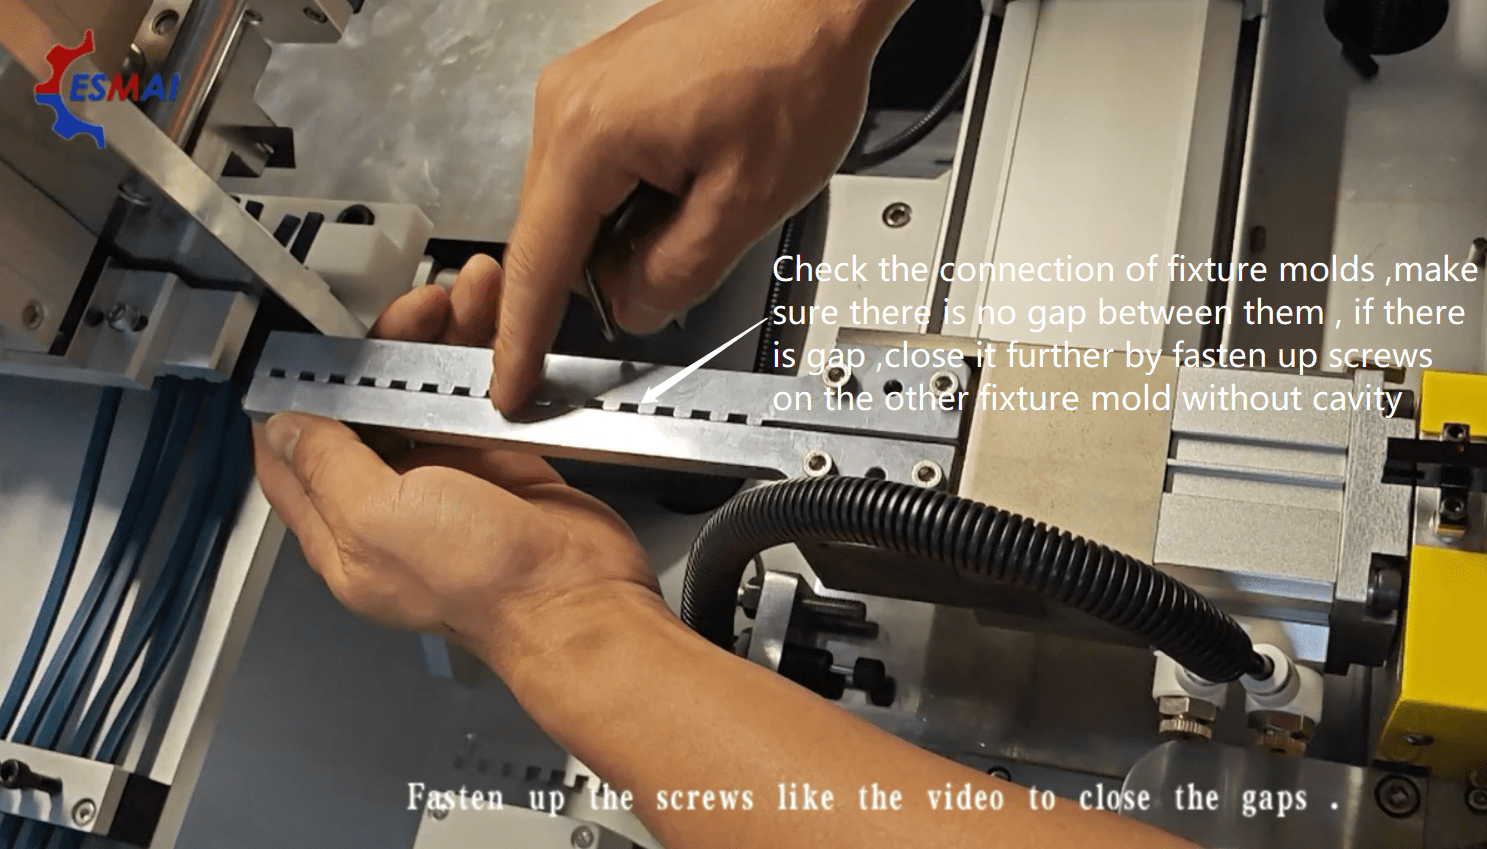
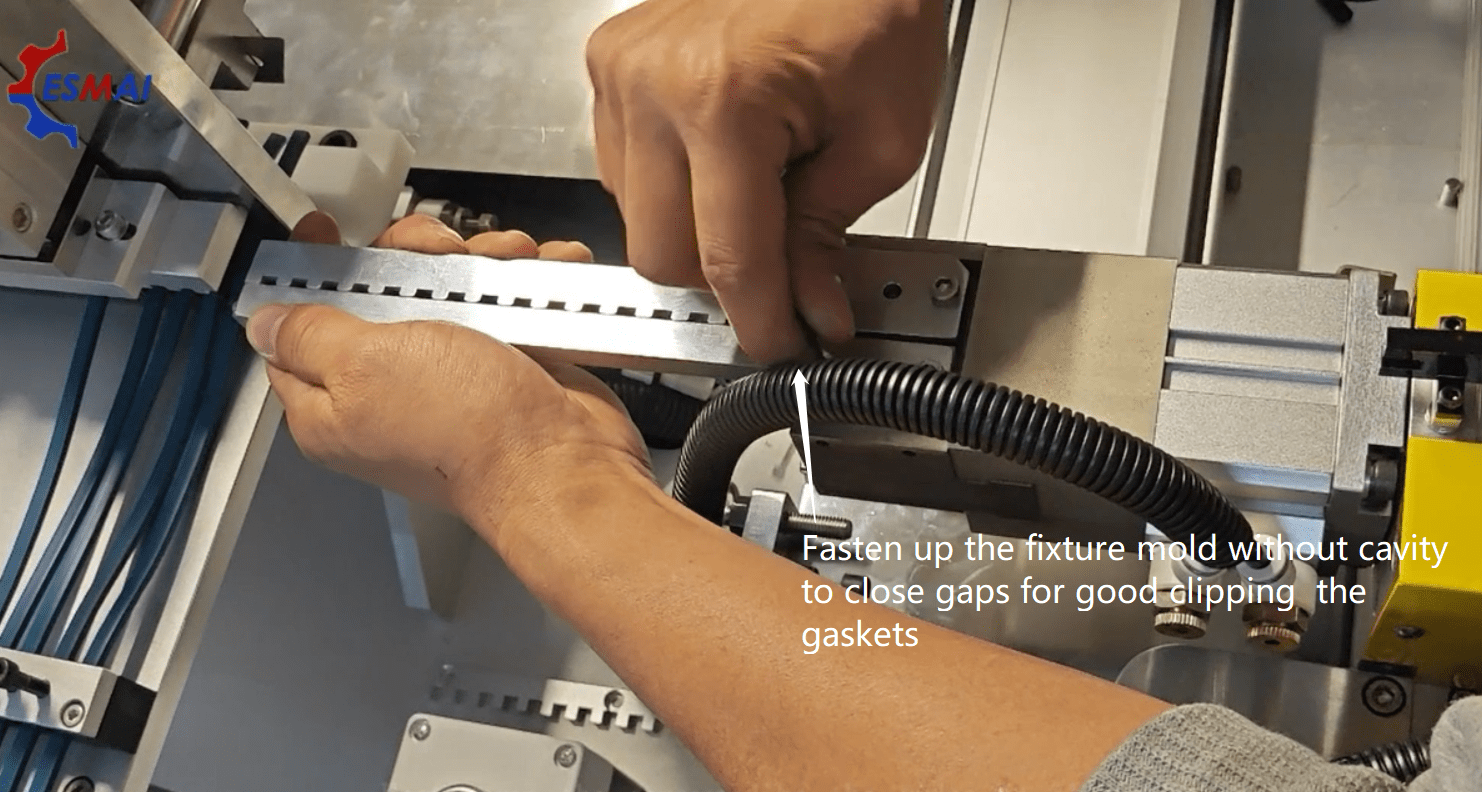
Check the connection of the fixture molds by closing the fixture molds (Press “Right/Left hand clip on”to close the fixture mold),
make sure there is no gap between ,if there is gap ,close it up .
Load on the hot molds
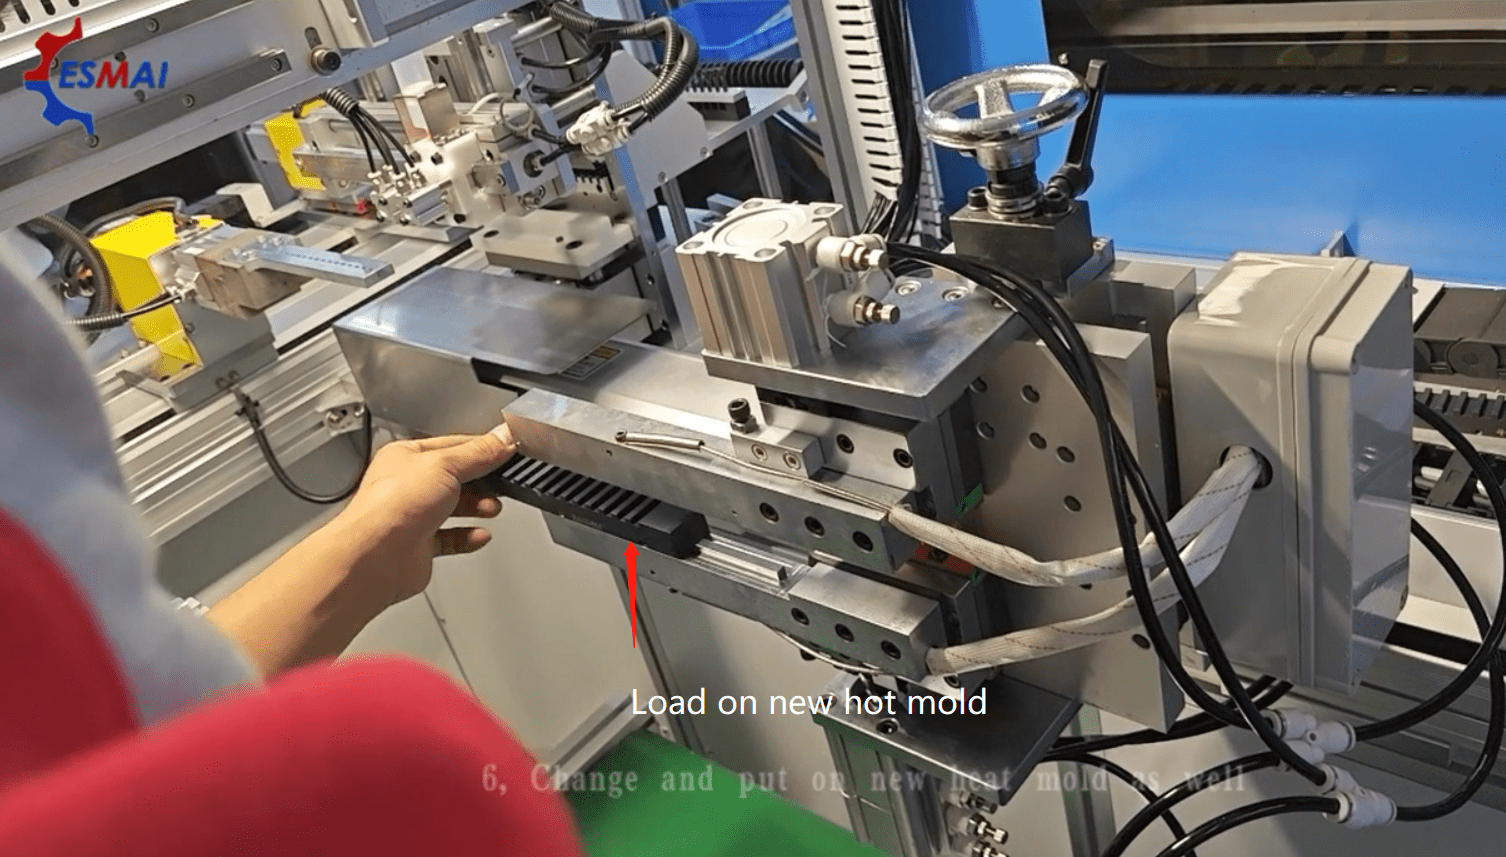
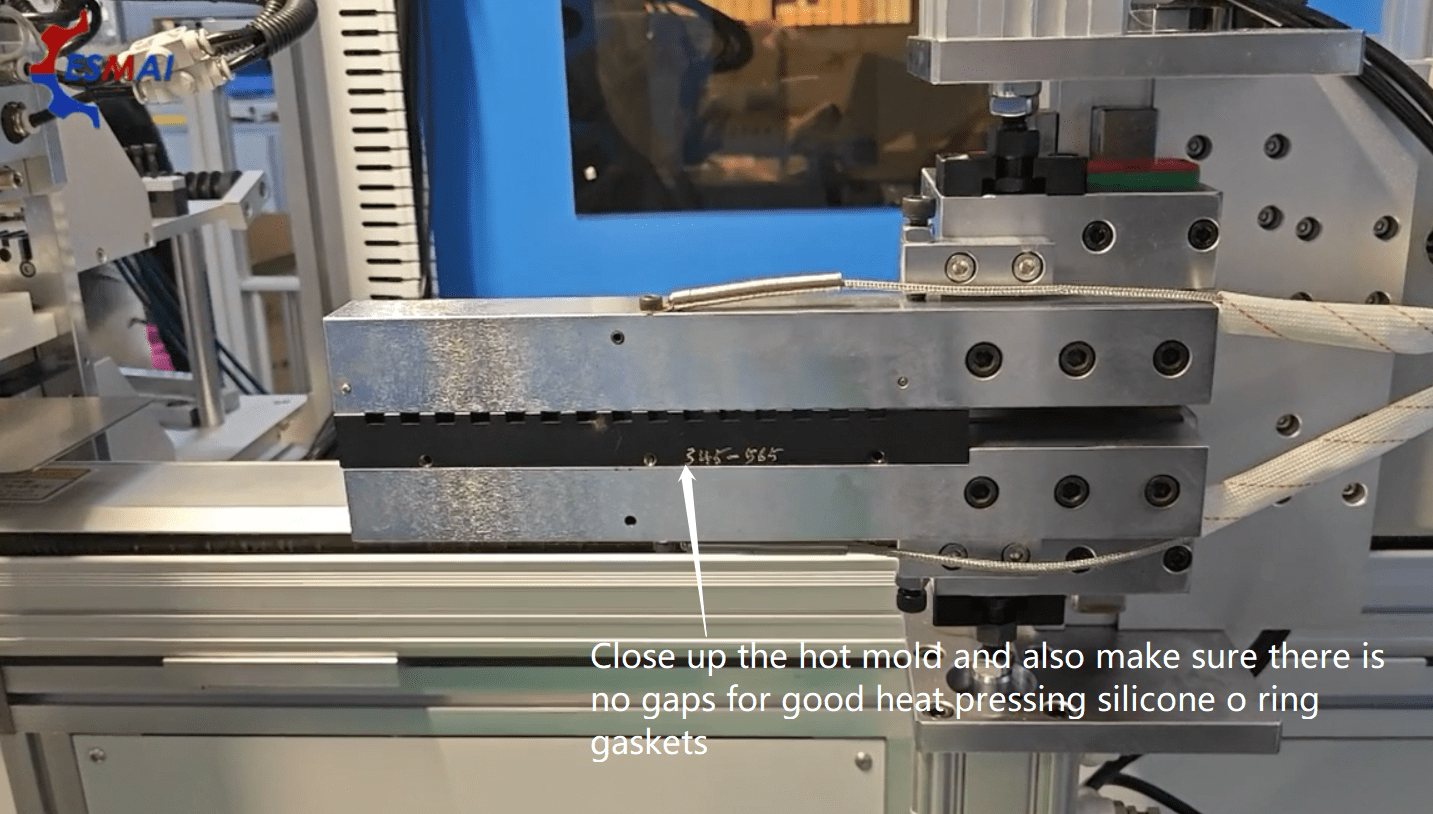
After putting the hot fixture mold in place , close the hot mold to fasten screws( Press “Hot mold manual”and press “Hot molds pressing”) ,
it is better to check and close gaps of the hot mold in this way.
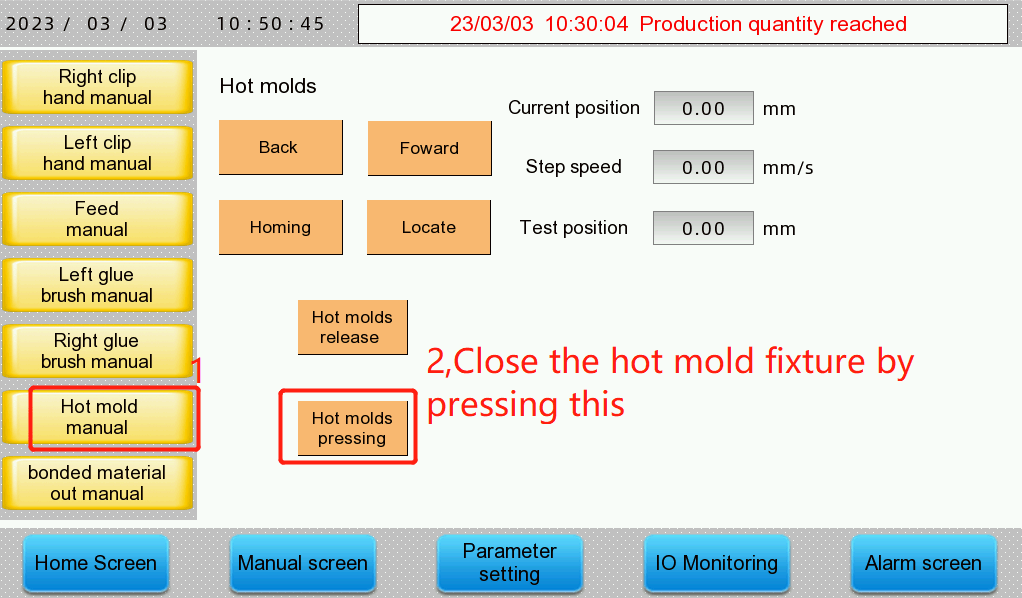
Fasten up the screws until there is no gaps

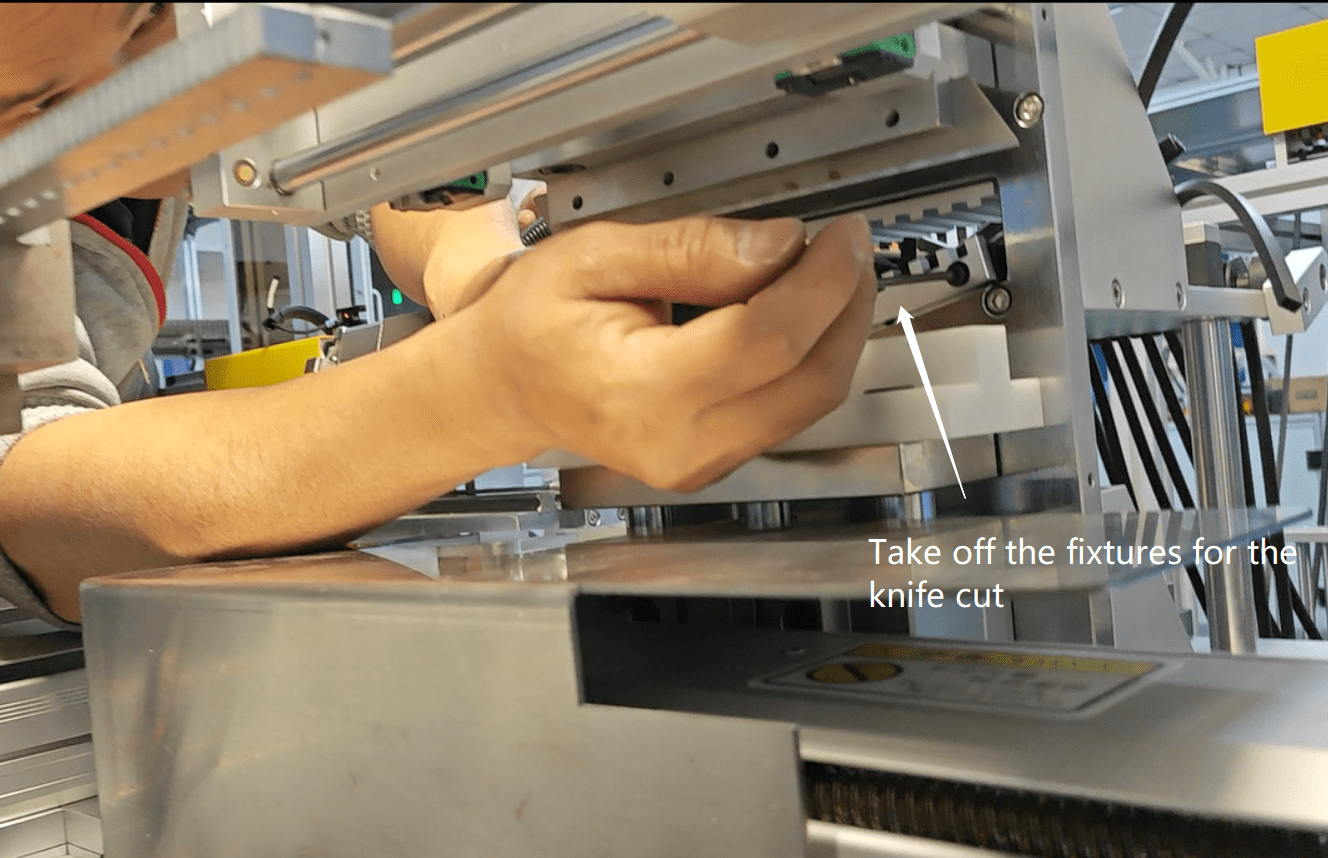
Take of f the fixture for the knife cut and put on new ones, if the fixture for the knife cut is closed , open it up by pressing “Feed manual” “Feed cut material”
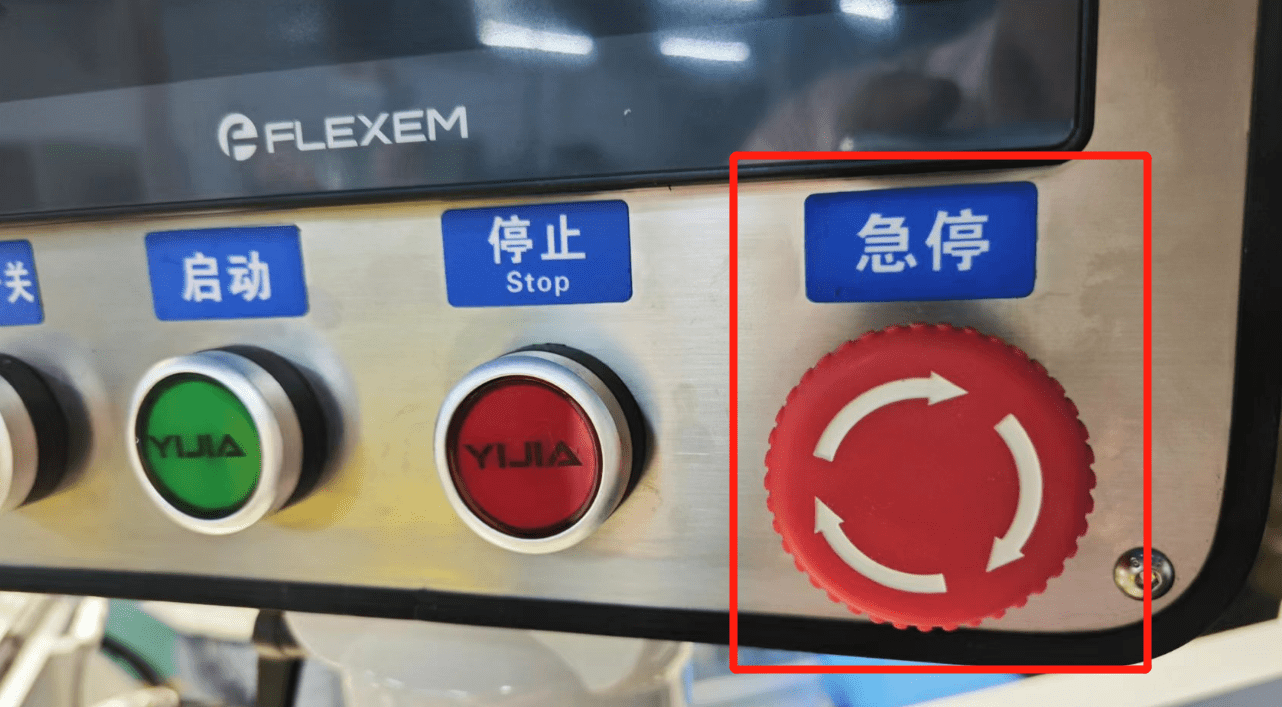
Warning: please remember to press down the “Emergency stop” in red button before we try to change the fixtures for the knife .
Step 2 Check fixture molds connections for the silicone o ring automatic cutting and bonding machine
Youtube video reference : https://www.chesmai.com/uploadfile/skycaiji/images/2024-10-25/2d719ab604761011f4ce83e3a3b67c82.jpg
After changing and loading on all the fixtures on the mechanical clips hands, fixtures for the knife cut , hot mold fixtures , then it is time to
check the mold connections between each other for smooth working of the machine .
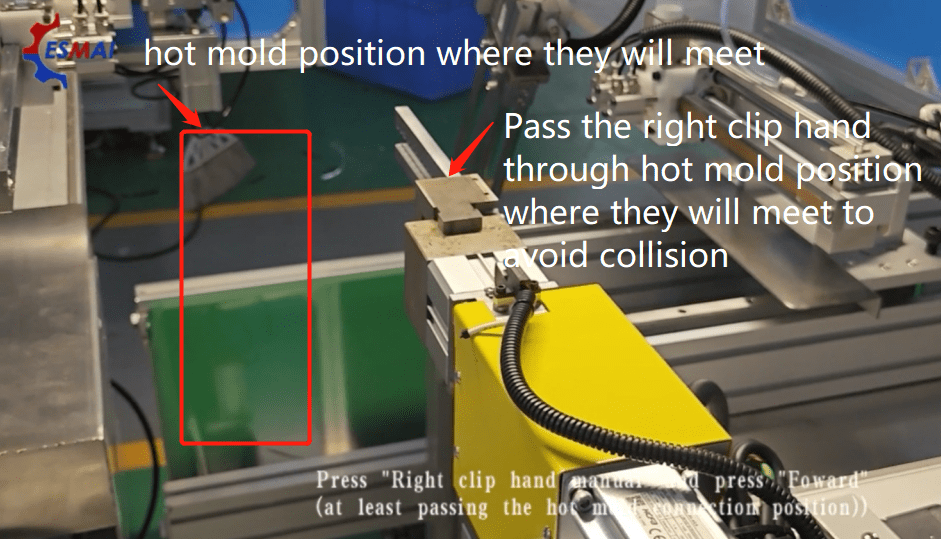
Press “Right clip hand manual” , press “Foward” , the right clip hands goes out . please make sure the right clip at least pass through
the vertical position of the hot mold where they meet each other .
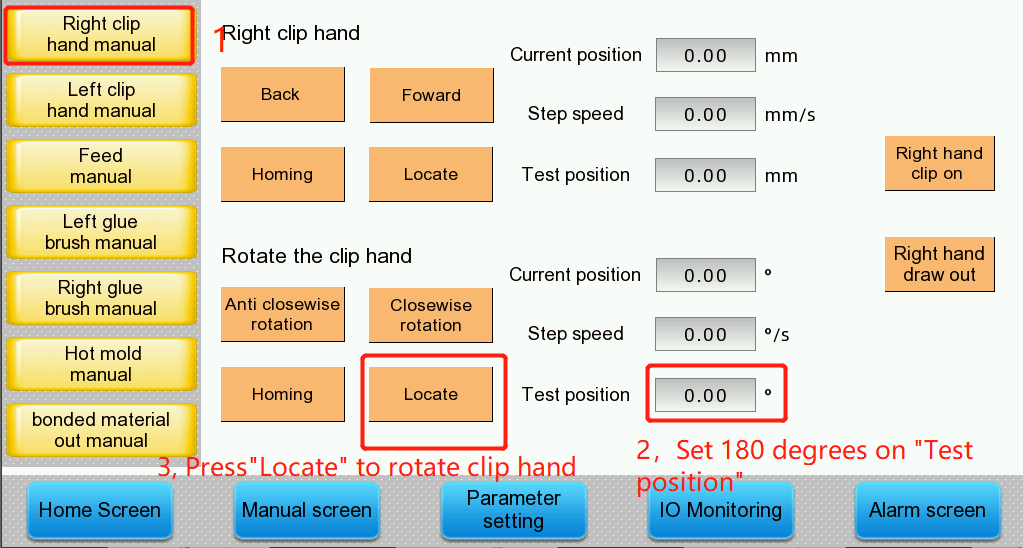
Press “Right clip hand manual”, press “Test position”and set 180 degrees ,then press “Locate” to rotate the clip hands
180 degrees which is the position to put gaskets in the hot mol
Press “Hot mold manual” and press “Foward” to get the hot mold move to meet with the right clip hand.
Close the right clip hand to the hot mold with a little gap just to check the mold cavities of the two fixture molds if they are fitting well in one line
If the hot mold is a little foward ,we can move it back manually and record its position for bonding
If the hot mold is a little foward , Press “Hot mold manual” press “Back” to get hot mold move back and record the “Current position” value
when molds fits well and enter the value on bonding position in hot mold parameter page .
If we want to set the hot mold position to fit well with clip hand molds precisely, we can set value on “Test position” and press “Locate ”
to make the molds fits well slowly and record the “Current position ”and enter this value on the hot mold parameter .
Enter the recorded value on the Bonding position of “Hot mold parameter” page , so in actual production , the hot molds
will meet and fit with the clip hands in the recorded position .
Check the mold connection of left clip hands with the hot mold in the same way
Press “Left clip hand manual” , press “Foward” , the left clip hand goes closely to the hot mold
Press “Left clip hand manual”, press “Test position”and set 180 degrees ,then press “Locate” to rotate the clip hands 180 degrees
which is the position to put gaskets in the hot mold
Press “Left clip hand manual” press “Test position” and enter the value which is recorded from the bonding position
of the “Hot mold parameter”and press “Locate” , the horizonal space will be fully closed between left clip hands
and the hot molds ,it is better to check the mold connections .
Check mold connection between the right clip hand and fixture molds down the knife
Presss “Home”to get moving components back to original position
Press “Right clip hand manual” press “Back” to get right clip hand back to fixtures down the knife . set the moving speed
of right clip hand to 10 when it is close to the fixture down the knife to avoid collision .
Step 3 Load the adhesive container with the adhesive
Youtube video reference : https://www.chesmai.com/uploadfile/skycaiji/images/2024-10-25/e37592c41fff2b57115c5026f3522e9e.jpg
Put the ready mixed adhesive in the adhesive container
Press in the cap after the adhesive is put in the container
Connect the adhesive container with the air tube
Load the adhesive container on the glue brush .
Press “Left /Right Glue brush manual” ,
Press “Left /Right glue release” to press down the glue in the container
Press “Left/Right glue brush board 2 lift” and press “Left/Right glue brush simulation”
to check the working of both left glue brush and right glue brush .
Step 4 Load the gaskets on the machine
Youtube video reference : :https://www.chesmai.com/uploadfile/skycaiji/images/2024-10-25/0a36fb26068d0f4451f3015c0a5555cb.jpg
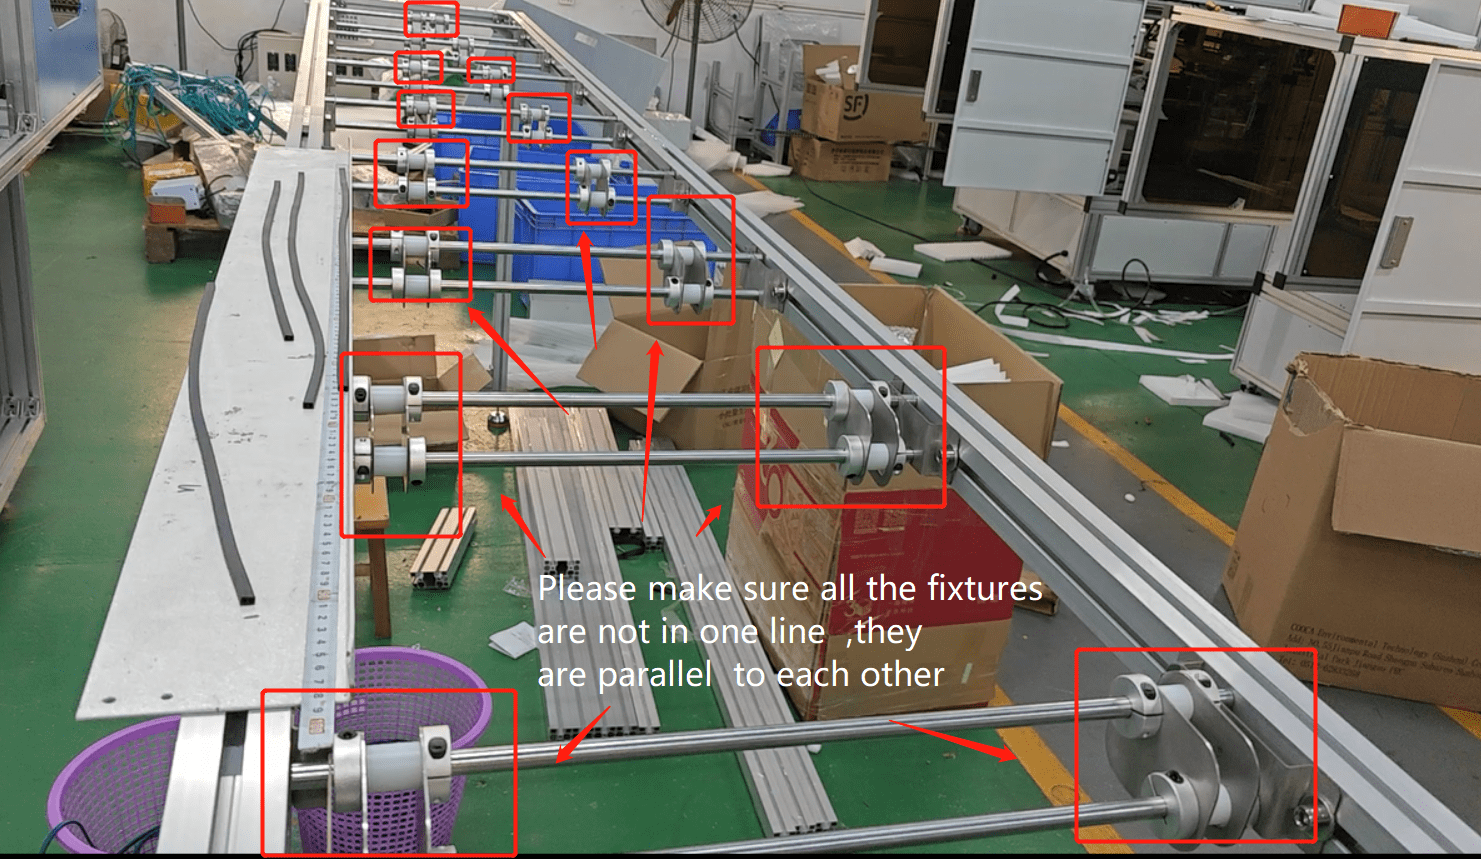
Please make sure all the fixtures are not in one line ,they are parallel to each other
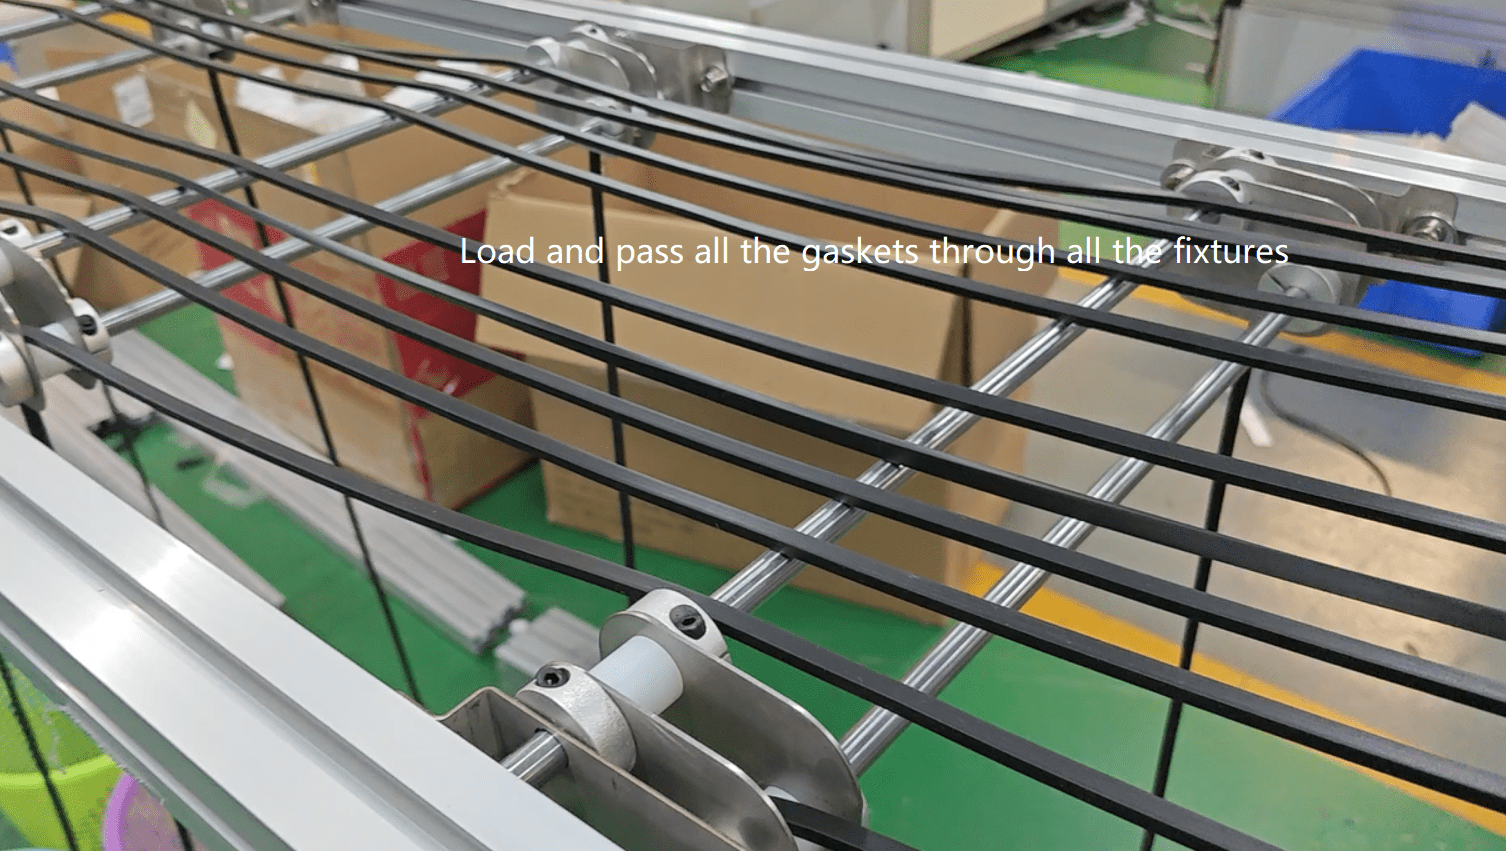
Load and pass all the gaskets through all the fixtures
Pass all the gaskets beneath every sensor
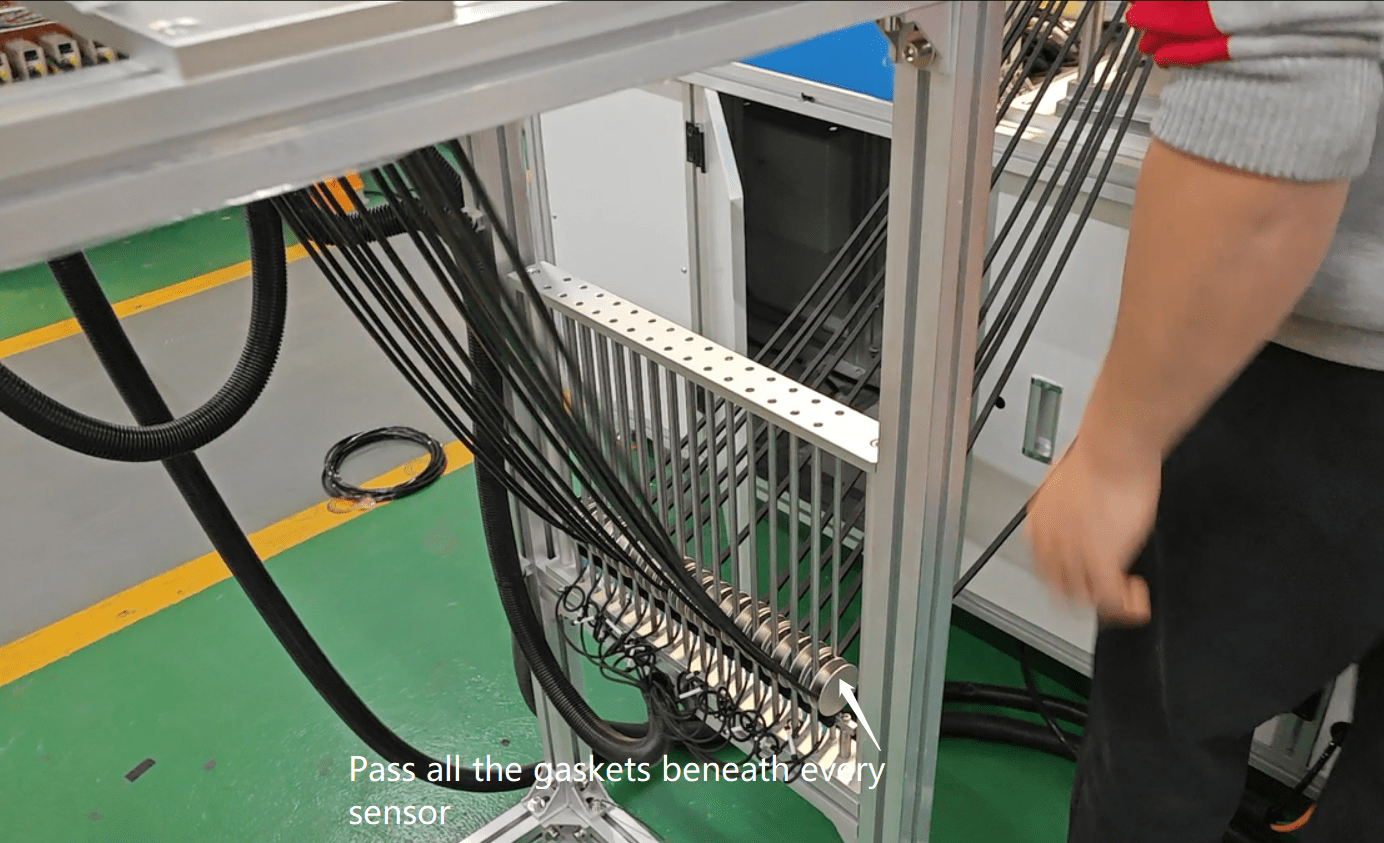
Pass all the gaskets after the knife and fasten up screws to avoid gaskets dropping down
Press “Feed manual” ,press “Feed press material” and “Feed cut material ” to get the fixure of the knife close down
and clip the gaskerts and the knife cut off the redudant gaskets .after that , customer can loose the screws which holds the gaskets to avoid it falling down.
Step 5 Set parameters and start silicone oring automatic bonding machine
Youtube video reference : https://www.chesmai.com/uploadfile/skycaiji/images/2024-10-25/9cb67f2209c072e86d7b9cff4a423550.jpg
Set the unit cutting length of the silicone gaskets by entering number on “Product cutting length ” ,like you cut 450mm per unit length ,
you input 450 in the”Product cutting length”,
Set the batch number in “Pack up times” ,like you set 2000 in the “Pack up times” , the machine will stop and wait for you to collect 2000pcs
of bonded orings and pack up . then continue to work for next batch .
Set “Heat Curing time” based on the size of the silicone gaskets and normal curing time of the htv silicone adhesive.normally we set 5-10 seconds
the heat curing time .(Dipping glue times is set at 2 times ,glue brushing times is set at 2times normally. if there is cutting length tolerance ,
we can make up the difference on “Length compensation”.)

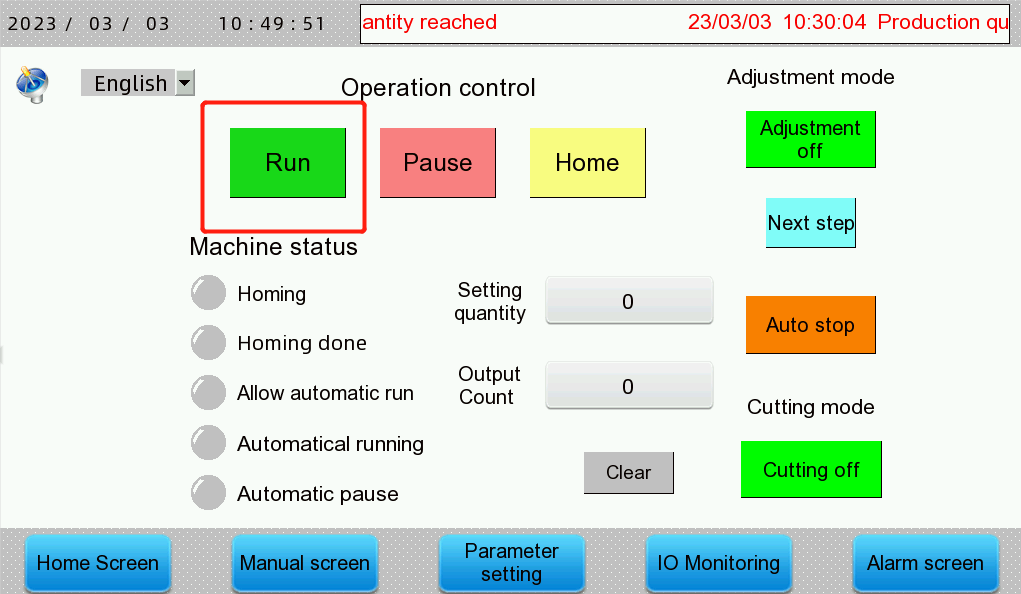
Press “Home screen” and press “Run” , the silicone oring automatic bonding machine will start production immediately .


 Home
Home  Silicone o ring automatic splicing machine introduction

